RV side view cameras are an important safety feature designed to eliminate blind spots while driving. Our Class A RV has side view cameras, but they have gotten so foggy that they are useless. We researched whether we should repair or replace our RV side cameras and found out how to save money. Read on the learn this easy RV Rear View Mirror Camera Fix in 15 detailed steps. You can fix your RV side view cameras yourself and save hundreds of dollars. This is an easy DIY RV project!
Fix Your Foggy or Malfunctioning RV Rear View Mirror Camera and Save Hundreds
Does your RV have a rearview mirror with a camera that is not clear or foggy? Can you fix your foggy RV Rear View Mirror Camera? Yes, you can fix your RV Rear View Mirror Camera yourself and save hundreds of dollars. If you are getting a picture to your dashboard monitor from your camera, but the picture is not clear then there are only two things it can be either a dirty camera lens or moisture has gotten into the camera.
Let me explain how we repaired our Rear View Mirror Camera in just a few minutes and saved hundreds of dollars by doing this simple fix.
By the way, as an Amazon Associate, I earn when buying qualified products through links on my site.
Our Steps to Repair Our Blurry RV Rear View Mirror Camera
We have Ramco RV side view mirrors with rear-facing cameras on the left and right sides of the bottom convex portion of the mirror. Since they have become so blurry, they are useless. I decided to contact the mirror manufacturer (in this case Ramco Engineering) to ask about a repair or replacements. I believe the steps we took to repair ours will work no matter what brand mirrors you have, provided the cameras are located in the mirror itself.
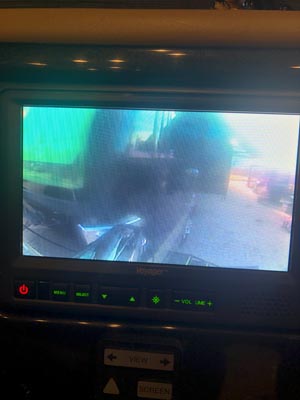
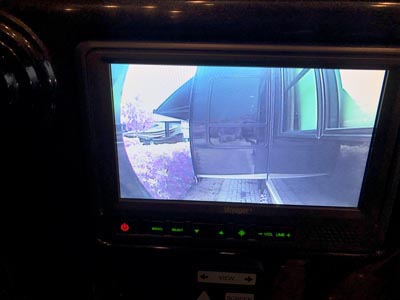
Here’s what our dashboard monitor looked like with the old RV Rear View Mirror Cameras:
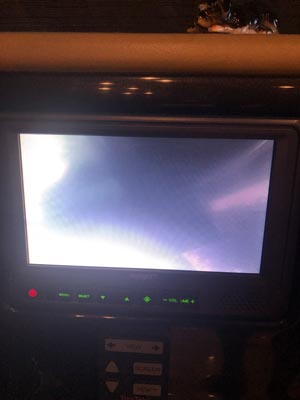 |  |  |
| Left Side | Rear Is Good | Right Side |
The RV mirror manufacturer said that the first thing to do is to check to make sure that the side view camera lens was not dirty on the outside. They also said that there is a plastic lens cap over the glass lens that will pop off and can be cleaned. That was not the case on our Newmar Mountain Aire, but your model may have those plastic lens covers. The first and easiest step is to check this first on your camera.
RV Camera Lens is Not Dirty but is Still Giving You a Cloudy Picture?
When I explained that dirt was not the issue, the RV mirror manufacturer told me that it was much easier to replace the entire convex portion of the mirror and the camera. That really didn’t make sense to me since there was nothing wrong with the mirror itself, it was just the camera that was cloudy.
I asked how much to replace the small convex portion of the RV mirror and the side cameras and they said that they start at $300- each! Not including shipping, tax, or installation.
Why Do Quality RV Camera Lens Fail?
We did more research and learned that many mirror companies purchase cameras from the camera manufacturers and then use their own wiring harness to attach them. This was exactly the case with our Ramco mirror. The camera was actually a Voyager brand (a high-quality brand used in the RV industry). We also learned that one of the main reasons these cameras fail has nothing to do with the quality of the camera, but that it is most often due to water intrusion from the mirror manufacturers using different wiring harnesses than what the cameras come with.
Can You Buy a New RV Rear View Mirror Camera?
I contacted Voyager to find out about purchasing new RV cameras and learned that they only sell through distributors. With a few more Google searches, we found a distributor named RV Cams out of Louisiana. They were incredibly helpful and walked us through exactly what we needed. These guys really know a lot about RV camera systems and we would highly recommend purchasing from them. You can click this link to go to their website- www.RVCams.com
Identify Your RV Camera Brand and Model
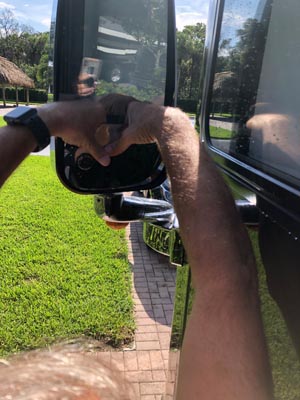
First, you need to determine what brand and model of cameras you have. Go to your RV mirror and using your hands, gently snap the convex mirror out of the entire mirror chassis by pulling at the top of the small mirror. (You may want to use safety gloves and glasses to avoid injury.) There are four tabs that hold it in place. You can then unplug the camera connector from the mirror assembly.
Look for the identifying numbers on the camera. Our Newmar 2014 Mountain Aire 4369 had Voyager model number VCMS-36RGP cameras. When I originally contacted the camera manufacturer, they told me that they had a new model VCMS-50RGP that replaced the prior model.
Order Your Replacement RV Rear View Mirror Camera
We discussed the model upgrade with the RV Cams team, and they could see no difference in the two models as of this writing, actually have manufacturers refurbished cameras that come with a 1-year warranty in stock. Those cameras are half the price of the model 50 (at approximately $70 each versus $150 each for the model 50), so we elected to replace ours with the same model 36.
Additionally, RV Cams suggested buying extension cables to splice into the mirror cable to avoid voiding the camera warranty. Great idea!
RV Cams ships with 2-day service, so we had our new cameras quickly and were ready to begin the replacement project.
Quick Tip: When you order the Rear View Mirror Camera, you can request left and right orientation but it really doesn’t matter because you can adjust the orientation once it is in the mirror.
Steps to Replacing Your RV Rear View Mirror Camera
1.) If you put your convex mirror portion back into the mirror assembly, you will need to gently snap it out again with your hands (may want to use safety glasses and gloves to avoid injury).
2.) Using masking tape, tape around the camera on the mirror to protect the surface and not scratch the mirror while removing the old camera.
3.) Using pliers, unscrew the retaining collar from the old camera housing to remove it from the mirror.
4.) Clean the mirror with a microfiber or non-abrasive cloth.
 | 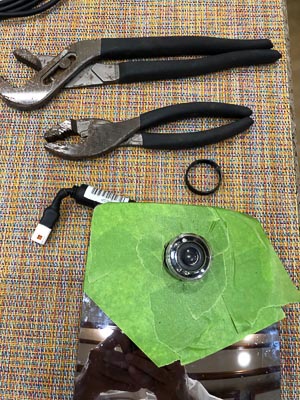 |  |
| Pull From The Top | Tools Needed | Old Camera Removed |
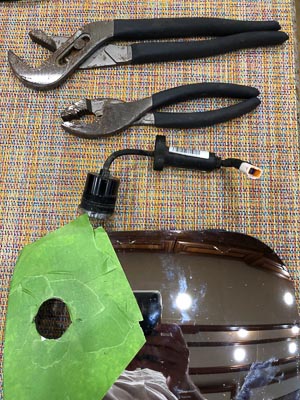
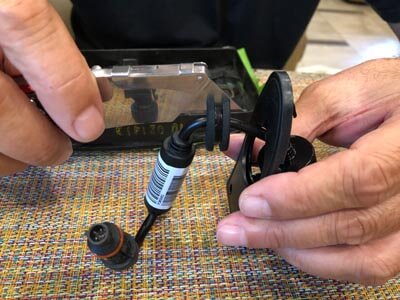
5.) Remove the new camera from the supplied housing. The new camera comes in a housing suitable for side mounting. In this case, we don’t need the side housing because it’s mounted directly in the mirror. Pry the back-housing plate on the new camera up slightly, just enough so that you can push the plate toward the rear to release the camera from the housing.
6.) Remove the grommet provided. We don’t need the grommet, so using a razor knife split the grommet being VERY CAREFUL not to nick the camera cable and remove the grommet.
7.) Remove the camera from the housing frame by unscrewing the retaining collar and then sliding the camera out of the plate.
8.) Remove the masking tape from the mirror that you put on in step two so that the camera, when inserted through the hole in the mirror, will rest on the mirror surface.
 |  |  |
| Camera & Housing | Pry up Plate | Careful!!! |
Quick Tip: When you order the Rear View Mirror Camera, you can request left and right orientation but it really doesn’t matter because you can adjust the orientation once it is in the mirror. For a good starting reference, the flat portion of the barrel should be orientated to the bottom of the mirror when inserting it. That should give you a close approximation of the orientation.
9.) Insert the new camera into the mirror and hand tighten the collar.
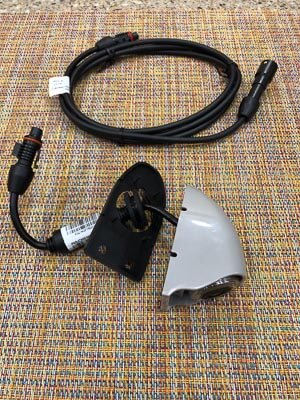
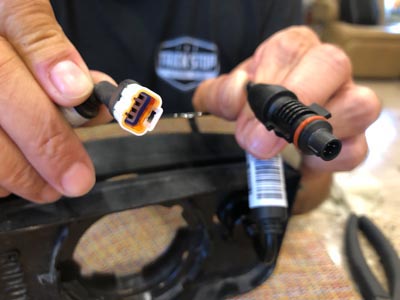
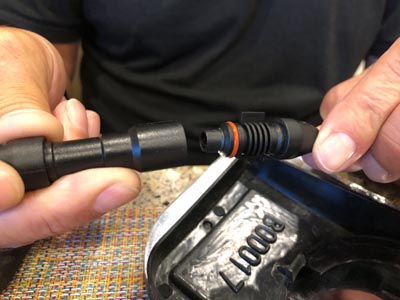
10.) Prepare the Camera Cables for Splicing. The new camera comes with a standard connector that generally doesn’t match the mirror manufacturer’s connector, if you took the recommendation above, that’s why you ordered the extra cable. Connect the female end of your extension cable to the male end of the camera cable. Remove the excess extension cable. Making sure to leave enough of a cable pigtail for splicing, cut the excess cable on the male end of the extension.
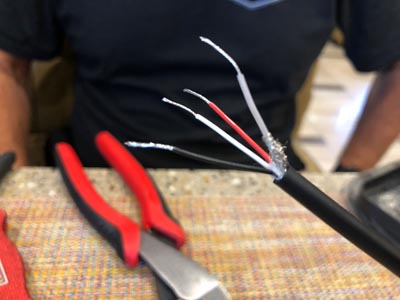
11.) Strip the main extension cable casing back about 1.5-2 inches. There will be 4 wires inside the casing- red is power, black is ground, white is audio, and clear is video. The clear video wire is also protected by a braided shield wire. Strip the video shield wire back about 1-1.5 inches and then strip all 4 wires back about half an inch back.
 |  |  |
| Different Connectors | Hook up Extension | Ready To Splice |
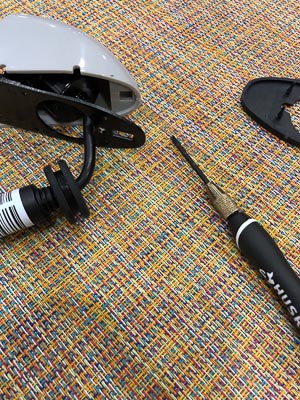
12.) Repeat stripping process on mirror wire outside on main mirror chassis.
13.) Splice the wires from the camera to the mirror wire. After splicing use heat shrink or self-bonding tape to protect the splice. I recommend a self-bonding tape called F4 Tape which bonds together and forms a water-resistant seal.
14.) Snap the mirror with your new camera back into place. Don’t forget your safety glasses and gloves!
15.) The final step is to adjust the camera orientation. This step is easier if you have two people, one inside watching the dash monitor and directing the installer outside which way to turn the camera to align the view straight down the side of your RV.
Repeat the exact same steps as above on the opposite camera, and you are done replacing your RV side cameras!
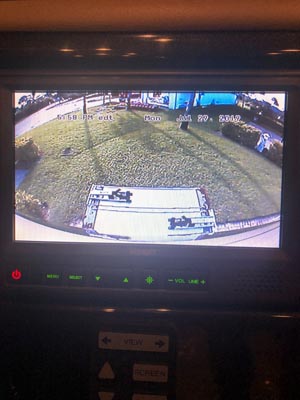
Here are the pictures we took of our dashboard monitor with our new cameras installed- amazing improvement!
 | 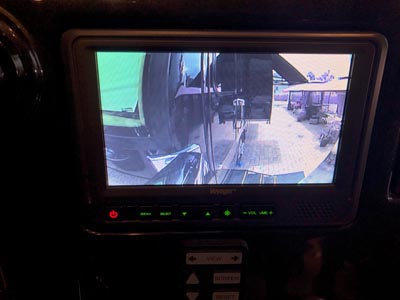 |
| Left Side | Right Side |
What Did It Cost to Replace Our RV Rear View Mirror Camera?
The total for two new RV Side Cameras plus the extension cables and shipping was $163- a savings of at least $450!
How Long Did It Take to Replace our RV Rear View Mirror Camera?
It took about an hour for each side and was pretty simple to do.
Related Questions People Also Ask
Do Backup Cameras Record?
No, backup cameras do not record. If you want an RV camera system that records, you will need a separate camera system.
How Well Do Wireless RV Backup Cameras Work?
Wireless RV Backup Cameras do work but they also are not entirely wireless. You will still need to provide it with a power source by wiring it into the existing power wires in your RV. Wired systems are generally more reliable.
Looking for more DIY RV Projects?