Since social distancing is exactly what we are all supposed to be doing now, why not redecorate your RV Interior with your spare time? You can order most things online and have them delivered and it’s a great morale booster!
Here are 14 Ideas for Redecorating your RV Interior.
Replace Your RV Wallpaper
Is your RV wallpaper showing its age? Why not wallpaper over it? You can do it in just a few easy steps.
Measure all of the walls in your RV that you plan on recovering. You want to make sure that you buy enough wallpaper of the same lot and manufacture date so there are no color variations.
Selecting your new wall paper
Consider the pattern and whether you will need to match up the pattern for each sheet (that requires much more wallpaper and can be harder to do)! Don’t forget your new wall coverings will need to coordinate with your floor and cabinets unless you plan on replacing them too!
Tip: Using wallpaper that does not already have glue on the back makes it easier to install.
Prepare Before You Begin
Move everything away from the walls. Clean your walls thoroughly with TSP and allow it to dry completely.
Wallpaper Application
Starting at the top of a wall in a corner to use the corner line as a guide, measure each piece of wallpaper and cut to fit allowing an extra inch or two so you don’t risk it being too short.
Brush the wallpaper adhesive onto the wall in a thin coat.
Apply the wallpaper from the top down and then smooth it in a downwards motion with the wallpaper tool, smoothing it as you go.
Rub your hands across it to check for air bubbles and smooth them out.
Repeat across the rest of the wall overlapping very slightly and applying extra glue as needed.
Trim Excess Wallpaper
Once all the wallpaper is up, then use the wallpapering tool as a straight edge and trim the excess wallpaper from the bottom with the razor knife.
Wipe any excess glue off with your damp cloth.
Stand back and enjoy your new wallpaper!
Tools You Will Need
- Wallpaper (it’s easier to use wallpaper without glue on it already especially in small spaces)
- Wallpapering Tool
- Clear Wallpaper Adhesive
- Paintbrush to apply adhesive to walls
- Razor Knife
- Measuring Tape
- Scissors
- Pencil
- TSP to Clean Walls
- Damp cloth for cleanup
Paint Your RV Walls
Not good at wallpapering? Another decorating idea that will make the most impact is to paint your RV interior walls. If done right, you can paint right over the existing wallpaper without having to remove it.
If your wallpaper isn’t peeling or would be too hard to remove then let’s paint over it!
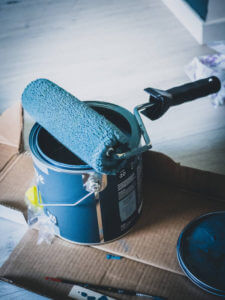
Plan Before You Paint
Get a rough measurement of how much wall space you plan on painting to be sure to buy enough paint.
Choose a complimentary color.
Clean your RV walls thoroughly and remove any decorations.
Lightly sand any edges where there is any damage, seams or imperfections.
Apply painters tape to the edges of window frames, countertops, or anything else you need to protect from paint overruns.
Cover any surfaces like floors or appliances and countertops with plastic sheeting to protect from paint spatters.
Use Correct Type of Paint
Apply an oil-based primer. It’s important to use oil-based primer and paint because water-based paints can soak into the wallpaper causing them to loosen and possibly sag and come off.
You may need to paint two coats of primer to cover dark wallpaper.
Stir your primer occasionally while applying since oil-based primers tend to separate while they sit.
After allowing the primer to dry according to the manufacturer’s instructions, you are ready to paint.
Apply 1-2 coats of oil-based paint on top of your dry, primer painted walls.
Once dry, remove protection tape, and you are done!
Tools You Will Need To Paint RV Interior
- TSP to Clean Walls
- Oil-Based Primer
- Oil-Based Paint
- Painters Tape
- Plastic Sheets to protect floors and appliances
- 2 sets of Paint brushes, small and large (1 for Primer and 1 for paint)
- 2 sets of Paint Rollers, small and large depending on room size (1 for Primer and 1 for paint)
Paint Your RV Wood Cabinets
Are you tired of the honey wood or dark colored cabinets in your RV? There’s a pretty simple fix- you can paint them!
The first step is to decide what colors you want to use on your RV cabinets. You might consider painting your upper cabinets a light color like white and your lower cabinets a darker color to add some decorator-style!
Also, consider buying new cabinet handles to replace old ones. This can make a huge difference and really customizes your RV kitchen without a significant cost!
Prepare RV Cabinets For Painting
Remove all cabinet doors and label them with painters tape showing where you removed them from.
Using a drill, remove all the hardware off of the cabinet doors.
Lay the cabinet doors on a painters drop cloth in a well-ventilated area.
Peel those painter tape location labels that you put on each cabinet door off and stick them next to each door on the drop cloth.
Remove Old Varnish
You can sand them if you wish, but I found it easier to use a stripping product (I used a product called Dad’s, but there lots of different brands out there like Krud Kutter), wipe down the cabinet doors to strip them of old varnish.
After stripping the old varnish, paint the cabinet doors with an oil-based primer. Use a small brush for the detail and corner areas and a small roller for the larger flat areas. Again, it’s very important that you are working in a well-ventilated area.
Once you are done with one side of the cabinet doors, go inside and, after opening all windows to allow ventilation, wipe the cabinet bases with the stripping product.
Tip: Be very careful to protect your surrounding floors and countertops well. If you drip any of the varnish stripper on the floor it will damage it. I learned the hard way to use a painters drop cloth and plastic sheeting since the stripper can eat right through the plastic.
Work On Cabinet Bases and Doors
After you are done stripping the cabinet bases, go back to your cabinet doors which should be dry by now, flip them over and paint primer on the other side.
Now back to your cabinet bases and finish stripping the old varnish off of the rest of them.
By now, your cabinet doors have primer on both sides and you are ready to paint them. Paint the backs first using a brush and roller and allow them to dry.
While your cabinet doors are drying, begin painting your cabinet bases with primer.
While the cabinet bases are drying, go back to your now dry cabinet doors and, flip them over and lay them on blocks of wood or empty cans to keep them from sticking to the drop cloth. Paint the front of your cabinet doors.
While doors are drying, go back and paint your cabinet bases.
Painting Cabinet Door Hardware
The next step is to paint your hardware with a metal primer and a paint color that compliments your cabinet colors. You can buy spray paint and primer all in one.
Just lay the hardware out on a drop cloth and spray all of the hinges and screws and allow them to dry thoroughly before flipping over and painting the other side.
The Last Step- Sealant
After all the paint is thoroughly dry on your cabinet doors, paint them with a coat of sealant like Varathane to keep the paint from chipping off.
When your clear coat is completely dry, install your new cabinet handles and reinstall your cabinet hardware and put your cabinet doors back on.
That’s it your beautiful new RV cabinets are done!
Refresh Your RV Dinette Chairs- 2 People, 7 Simple Steps, and 15 minutes!
Revive your dining room chairs in 15 minutes! Just recover the old seats with new fabric. All you need are a few simple tools.
- Screwdriver to remove chair seats
- Hand staple gun or pressured staple gun
- Staples
- Fabric
- Scissors
- Measuring tape
Fabric tips-
You will want to have plenty of fabric to work with, so measure your chair seat width and depth and add 10 inches to each cushion.
Choose thicker cotton for durability.
If you pick stripes, it’s important to get them straight and it normally looks better to run them from front to back of the chair instead of sideways.
7 Easy Steps To Recover RV Dinette Chairs
Step 1- Take your chair cushion off of your chair. Cushions are normally attached with screws.
Step 2- Trim a piece of fabric 10 inches bigger than the chair cushion
Step 3- Lay your fabric print side down on a clean firm surface and place cushion, face down, on the fabric
Step 4- You will need 2 people for this next step, one person pulls the fabric tight while the other person staples around the edges of the cushion about 1 inch apart, working your way around the seat and saving your corners for last
Step- 5- Fold your corners in and staple
Step 6- Trim the excess fabric from the back of the cushion so that none hangs down under the chair
Step 7- Reattach cushions to your chairs and you are done!
Update RV Window Valances
Are your RV window valances old and dated looking? Why not recover them or remove them entirely?
This can be done pretty easily by removing the valance and recovering with new fabric for a fresh new look.
If you decide to remove valances entirely, this can be done with basic screwdrivers.
If you want to go the extra step of recovering your valances, consider carefully removing the old fabric to use as a pattern for your new fabric. If your RV valances are just a basic square shape, you can staple new fabric over the top of the existing fabric.
Recover Your RV Bed Headboard
Recovering your RV headboard can give a whole new look to your bedroom!
Steps to Recover Your Headboard
- Remove the headboard
- Measure the height and width of the headboard all the way to the edges and then add several inches to allow you to wrap around to the back of the headboard
- Make sure to purchase upholstery weight fabric (ask for it at your local fabric store)
- Cut your fabric to size
- Lay the fabric face down with headboard on top
- Staple fabric to the back of headboard down one side
- Stretch fabric tight on other side and staple down the other side
- Reinstall your headboard and you’re done!
Tools You Will Need To Refresh Your RV Headboard
- Screwdriver and pliers to remove the headboard
- Fabric tape measure (metal ones are too hard to use for this)
- Scissors
- Staple Gun
- Staples
Remove and Replace Your RV Slide Carpet
We hated having carpet on our RV slides. It’s hard to keep it clean and it just seems to look old. After much research, we decided to replace our RV’s carpet with the Lifetime Vinyl product that looks like wood.
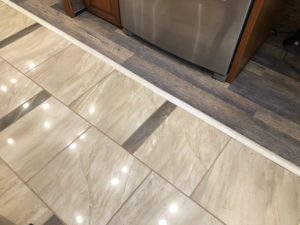
We found it at Home Depot and since it’s waterproof and lightweight, it was a perfect choice. Plus we found a shade that compliments our porcelain tile floor.
Time Consuming But Totally Worth It
This job took us about 5 days from start to finish. Plan on giving yourself plenty of time to properly remove the carpet, prepare the floor, and cut and install the vinyl flooring.
The installation instructions are on the box, but let me give you a quick summary of what you will need to do.
Steps To Replacing RV Carpet With Vinyl Flooring
First, remove all of the old carpet and discard it. Pull all of the carpet tack board, any glue, and all of the staples from the floor. There were a lot of them so this step can take a while. It’s important to get all of the staples out so they don’t push up through your new floor.
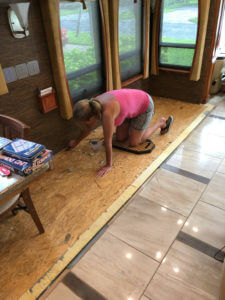
Next, starting in a corner, begin laying your floor. We decided to install ours as a floating floor, rather than attaching it to the floor and that worked perfectly.
We ordered our transition step directly from Newmar, and attached it with permanent contact cement.
This RV remodeling project is a little more time consuming to complete, but is totally worth the effort!
Replace RV Artwork With Pictures of Your RV Travels
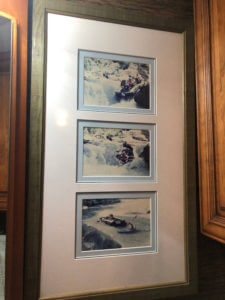
RVs generally come with some generic artwork on the walls. Why not take some of your own travel pictures, and have them printed to fit existing frames?
It’s a great way to personalize your motorhome and add some fun memories!
Install Peel and Stick Backsplash Tiles
I was skeptical about how these peel and stick-on tiles would look. But after a friend installed them in their RV, I was very impressed!
They are made of vinyl, so they don’t add extra weight to your RV. They are also very easy to install and can be done pretty quickly, depending on the size of the area you are covering. Since they are self-sticking, no glue is needed and they are pre-printed with grout lines so no messy grout to deal with!
Tip: These peel and stick tiles work well as a backsplash or wall covering even in a bathroom, but they should not be used in a shower or as a floor covering.
Tools You Will Need To Install Peel and Stick Tile
- Measuring Tape
- Scissors
- Pencil
- Straight Edge or ruler
- Scrap paper the size of the tile squares for templates
How To Install a Peel and Stick Vinyl Tile
- Remove any decorations from the wall
- Clean the surface thoroughly with a degreaser
- Starting in a lower corner, peel the backing and begin sticking the tile to the wall
- Continue sticking the tile, making sure that they are lined up evenly
- Once you get to an area you need to cut, such as around a window or cabinet, use the scrap paper to create a template for the cuts you will need to make.
- Cut the template or pattern out of the scrap paper, then use that to mark the tile for your cuts.
- After installing press your tiles firmly to the wall and within 48 hours the glue will be set.
Tip: You can usually remove a tile at least once without damaging them if you don’t have them positioned correctly. Just don’t press them firmly down until you have them in the right place.
SMART TILES- https://www.thesmarttiles.com/en_us/where-to-buy/
Install Undercounter LED Strip Lighting in Your RV
We used the LED tape lighting and it makes a big difference. You can get them in various colors, they are easy to install and you can get them with remote controls or can use a Smart Plug to have them turn on with a voice command.
They can be purchased in lengths up to 24 feet and they can be cut or joined together to custom fit to your RV.
Tools You Will Need to Install LED Tape Lighting
This is also a pretty easy job to do and no special tools are needed. You just need a measuring tape and scissors.
Installation Tips For LED Tape Lighting
- For maximum light output, mount the tape light underneath the cabinet approximately 1-2 inches behind the front cabinet edge.
- If your countertop is highly reflective, mount the tape light on the inside back of the cabinet frame facing toward the backsplash.
- If you don’t have a cabinet lip to attach to or want to hide the light strip, add a piece of quarter round molding to the bottom of the cabinet.
Change Your RV Countertops
Our friends that did the beautiful bathroom remodel on their Tiffin RV, showed us how great butcher block countertops can be. This is a more complicated project but can provide outstanding results.
As you can see from the photos, they chose to replace their RV sink with a vessel sink instead of an under-counter one. They also decided to whitewash their butcher-block counter-top, which looks fantastic!
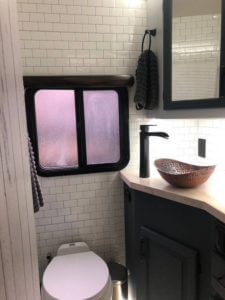
Here’s a video that shows you in detail, how to replace your countertop with butcher block counters.
Change Boring RV Sinks To Beautiful Vessel Sinks
Another idea that can transform your RV is by replacing your old under counter sink with vessel sinks. They are beautiful, come in many colors and styles, and make a huge difference.
This Lowes video shows you how to replace an under-counter sink with a vessel sink. Even though the installation is done in a home, the steps to install will work in an RV too.
Upgrade RV Faucets
If you are upgrading your RV countertops and sinks, don’t stop there! Consider upgrading your faucets to complete your makeover.
Most Class A motorhomes can use the same faucets that are found in homes, and using a quality faucet reduces the chance of leaks.
Add Some Shelves to Your RV Walls
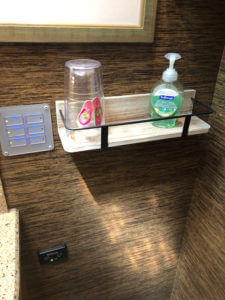
Our second bathroom in our Newmar RV is a half bath, and there is not much counter space. That’s when I came up with the idea to add a small shelf.
The trick is finding a shelf with the right width (mine couldn’t be wider than 4”) and the right length for your space. I also wanted one with a railing to keep objects from sliding off while we travel.
Tip: We do use museum putty to keep things in place while we are driving our RV, but some things are used daily and we don’t want them attached.
You can make your own custom shelf, but I found these that work perfectly. Just mount them to the wall of your RV using small screws.
I hope you enjoyed these 14 RV remodeling ideas!
Remodeling your RV can be fun and it also lets you add your own personal touch!
